Home » Home Services
Category Archives: Home Services
Mold Removal: What Is Mold Remediation?
Mold and mildew grow where there is moisture and food, which in a home is usually organic material like wood. Mold removal requires a thorough inspection and cleaning to remove spores and prevent regrowth.
Non-porous surfaces can be scrubbed clean with household cleaning products or a bleach solution. Porous surfaces like wood and drywall may require replacement. Click https://acemoldspecialist.com/ to learn more.
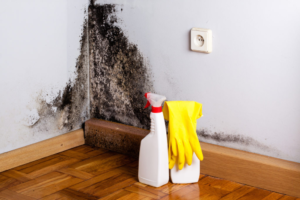
Mold isn’t just unsightly; it can cause a host of health problems for both pets and people. That’s why it is important to have a qualified professional inspect and remove mold from your home or building as soon as you notice it. Mold removal specialists will be able to assess the situation and come up with a plan for removing the mold as well as the spores that caused it in the first place.
Mold specialists have years of experience in inspecting homes and identifying mold. They have the right tools and equipment to do the job safely and effectively. They know the right methods to use and will test afterward to ensure all the mold is gone. They can also offer advice on how to prevent future mold growth, such as ensuring there is proper ventilation and fixing leaky pipes.
A good mold specialist will have the right equipment, including air scrubbers, negative air machines, plastic sheeting, and personal protective gear. They will also be able to provide references from past clients. Before hiring a mold remediation company, make sure you do your research and find one that has the proper credentials, excellent customer reviews, and a strong reputation.
When it comes to mold and mildew, all it needs to grow is two elements: moisture and a food source. Both of these can be found in abundance throughout any home or business, and that’s why it is so important to have mold removed as soon as you spot it.
Mold can cause a variety of issues, from mild to severe. The more severe cases can lead to serious respiratory problems, rashes, and even death in humans. It can also damage surfaces and furnishings, and can create a musty odor.
When mold and mildew are left unchecked, it can spread to other areas of the house or office, creating a much larger problem. It can also cause structural damage to the property, and may even require expensive repairs. Hiring a qualified mold remediation specialist will help you avoid these issues, protect your health, and keep the cost of repairs down.
Prep the Area
Mold is a fungal growth that can lead to serious health issues and structural damage. It thrives in damp areas, where airflow is poor and organic materials are plentiful. If you suspect that there is a problem with mold in your home, it’s important to act quickly before the mold spreads and becomes a much more difficult situation to solve. Mold remediation is the process of cleaning up and removing all forms of mold from affected areas. It can also include identifying and fixing the cause of the problem to prevent future mold growth.
To clean up mold, you need to prepare the area. This involves sanitizing non-porous items, like metal and plastics, and tearing out or discarding porous items, such as drywall and insulation. Mold spores can easily travel from room to room in your house, so it’s essential to isolate the contaminated area and block off air vents before you start cleaning.
You should also remove any belongings that came into contact with the mold and take them outside. These items will need to be cleaned and sanitized before you can return them to your home. This step is important because if you bring these items back into your home, they will be exposed to more mold spores and may reinfect the area again.
The next step is to spray the area with an EPA-approved biocide. This product makes the spores sterile and kills them, so they can’t reproduce. Professionals will use the biocide on both non-porous and porous surfaces, including drywall and insulation. They will also use commercial-grade antimicrobial sprays to kill as many spores as possible on items that can’t be removed, such as wooden wall studs.
Once the area is sanitized, the professionals will begin the cleanup and removal process. They will cover the contaminated area with 6 mil polyethylene sheeting and seal the seams. They will use fans and other tools to ensure that the contaminated area is humidity-controlled. They will then vacuum the sheets and dispose of them in a safe way. If the mold is extensive, the occupants of the home may need to relocate temporarily during this stage. This decision should be made after a careful review of various factors, such as the type and extent of the mold, the sensitivity of the occupants and the potential health risks that could develop during the remediation process.
Clean the Area
During mold remediation, specialists use an EPA-approved biocide to kill any mold spores that remain. This will prevent the spores from spreading during and after the cleaning process. After the biocide is applied, experts will use commercial-grade antimicrobial sprays to treat porous items like wooden wall studs and carpeting. They’ll also wipe down non-porous surfaces and appliances, such as metal sinks and tile countertops.
The final step in a mold removal process involves re-inspecting the affected areas to verify that all traces of mold have been eliminated. Depending on the severity of the contamination, it may be necessary to throw out items that are contaminated with mold, including carpeting, drywall and fabric-covered furniture. Alternatively, these items can be carefully cleaned by professionals before being disposed of in a safe landfill or recycling facility.
While a regular cleaning routine can keep the levels of mold spores in your home down, it is important to keep in mind that these spores cling to everything they touch. When they’re disturbed, mold spores release tiny toxins that create an unpleasant earthy smell and trigger allergic reactions. These toxins are called mycotoxins, and they can stick to clothing, animal fur, vehicles and anything else they come in contact with.
Because of this, it’s best to hire a professional to handle any mold issues that appear inside your home. It’s especially important to have a professional assess your indoor environment, as mold can hide in places that aren’t readily accessible to you, such as inside walls and behind furniture.
When it comes to removing mildew or other types of surface mold, there are some things you can do yourself, such as:
Begin by removing any obstacles or furnishings from the area you plan to clean. This will give you unobstructed access to the affected area and will help prevent the spread of mold spores while you’re working. For hard, non-porous surfaces, mix a solution of equal parts water and white vinegar in a spray bottle and apply it to the affected area. Scrub the mold stains and rinse thoroughly with water afterward. To scrub more stubborn stains, try using a brush with a longer handle or a power tool equipped with a soft brush attachment.
Dry the Area
While cleaning the mold, it is also important to dry the area. This will help prevent mold spores from spreading throughout the house as they do in a damp environment. Using a fan and a dehumidifier in the affected room can help with this. It is also helpful to open windows in the room to speed up the drying process.
Depending on the type of mold, some cleaning products may be used in place of bleach to kill it. However, the best way to remove surface mold is to clean it with water and detergent or vinegar. If the mold is on a soft surface or has grown into the material, it will need to be cut away and replaced. This is best left to a professional, especially if the problem appears to be getting worse rather than better.
When using vinegar to clean surfaces, a mixture of equal parts water and white vinegar can be applied with a spray bottle. The spot will need to sit for a few minutes to allow the solution to penetrate the mold and dissolve it. Then the area can be scrubbed with a brush and rinsed with water.
After the mold is cleaned, a fan should be placed in the room to blow air across the damp area and speed up the drying process. Once the area is dry, it should be repainted with a paint that contains mildewcide to stop mold growth.
It is possible for a homeowner to remove mold on their own if the problem is relatively small, such as a single patch of green or black mold in the corner of a bathroom. However, suppose the problem is larger than a square foot of mold and the home owner does not have personal protective equipment (such as an N95 respirator, eye goggles without vents and rubber gloves that extend to mid-forearm). In that case, they should call in a professional. Likewise, if the mold appears to be causing health problems, such as asthma or hay fever, a doctor should be consulted immediately. This is particularly true if the mold appears to be Aspergillus, which is common indoors and produces potentially health-threatening mycotoxins1. 1.
Drain Cleaning – Safe Ways to Get Rid of a Stucky Clog
Drain Cleaning Perth involves removing or dissolving build-up in your home’s plumbing lines. This could be anything from hair or soap residue to food scraps and scum.
Regular drain cleaning can prevent foul odors and reduce the need for targeted drain cleaning services. Here are a few methods you can try at home.

There are times when using liquid drain cleaners is the best option to remove a stubborn clog. But other ways are much safer and will not damage your pipes.
Chemical drain cleaners work by creating a chemical reaction with the substance that is causing the clog. This chemical reaction usually involves donating or receiving electrons to and from the clog material, which breaks it down into smaller particles that can be pushed through the pipe. These cleaners are typically very toxic and must be handled with extreme care. They can irritate the skin, eyes, and nose of those who come into contact with them. They also pose a serious threat to the environment.
Many of the chemicals used in these cleaners are corrosive, which means they can cause extensive damage to your pipes if they seep into them. They can also be eaten through metal pipes, so it is important only to use them when necessary.
These cleaners can also be very dangerous for children and pets. They often release fumes irritating the eyes, nose, and lungs. If the cleaner gets on the skin, it can burn and cause chemical burns. Inhaling these fumes can also lead to headaches, dizziness, and nausea.
Liquid drain cleaners are also not good for the environment. They often contain acids, eroding the metals in your pipes over time. They can also seep into the groundwater and cause environmental damage. In addition, they may only be effective for some types of clogs.
For example, they may be unable to break down a hair clog or a blockage caused by mineral deposits. It is best to only use these products if a plumber specifically recommends them. A more environmentally friendly way of cleaning your drain is to have it hydro-jetted. This method is more expensive than chemical drain cleaners, but it is better for your pipes and the environment. It can also be done more quickly than other methods.
Baking Soda and Vinegar
You’ve probably heard that baking soda and vinegar are household staples with plenty of uses. When mixed together, they can clean sinks, tubs, and toilets; remove odors; and even clear small clogs. They’re also eco friendly, free of harsh chemicals, and inexpensive. While this combination is effective in many situations, it’s not the best solution for a major drain clog.
The reaction between the two ingredients creates carbon dioxide gas that can dislodge blockages, but it’s not strong enough to break down or dissolve tougher materials like hair, grease, and food scraps. Using this method may also cause damage to your pipes because the carbon dioxide will build up inside them, creating pressure that could eventually lead to cracks or leaks.
Instead of pouring baking soda and vinegar into a fully clogged drain, try using boiling water to loosen the gunk. Start by pouring a pot of scalding hot water down the drain, then pour in about 1 cup of baking soda. Cover the drain with a damp cloth or stopper and let the mixture fizz for about an hour. Then, flush the drain with more hot water to remove the loosened clog.
If you’ve tried the baking soda and vinegar method several times and can’t unclog your drain, try using a salt and vinegar solution. Start by pouring one cup of baking soda into the drain, then add a half cup of salt. Let the mixture sit in the drain for several hours (overnight is ideal). Then, flush the drain with hot water to remove the clog.
If your garbage disposal is clogged, try dropping in some ice cubes and a few handfuls of salt. The ice and salt will help to dislodge stuck-on foods and scour the inside of the drain. You can also try filling the drain with a few cups of boiled water, then pouring in a cup of white vinegar. The reaction will produce bubbles that can help to dislodge food debris from your garbage disposal. If your drain still isn’t unclogged, contact a professional for assistance.
Plumber’s Snake
The plumber’s snake, also called a drain auger, is an essential tool for any home to have. This ingenious plumbing tool looks like a long metal cable with a corkscrew-shaped auger coiled around it. This auger is designed to grab and break up obstructions that have formed inside the drainpipes. The cable and auger are housed in a drum that is equipped with a crank handle, making it easy for you to feed (push) the plumber’s snake into your blocked drain.
When using a plumber’s snake, it is important that you prepare yourself and your work area properly. This can be a messy job, so it’s best to put on rubber gloves and cover any surfaces that may be damaged by the snaking process. Then, remove any items that are blocking the clogged drain and prepare to start. It’s often a good idea to remove the trap arm and p-trap, as this will make it easier to get the snake into the drain.
Once you’ve done this, manually thread the head of the snake into the pipe. For best results, it’s often a good idea to run cold water while you snake the drain. This will help to dislodge any clog material and move it down the pipe. It’s also a good idea to periodically withdraw the snake and check for any debris that might be stuck to it. Be sure to be gentle while snaking the drain, as too much pressure could result in the tool getting stuck in or damaging the pipe or its entrance.
If the snake is unable to break up or dislodge the clog, it’s time to call in a professional. It’s important to note that snaking can damage your pipes and drains if done incorrectly, so it’s always best to leave this task to the professionals.
After you’ve successfully snaked your blocked drain, it’s important to clean the snake and reassemble any parts that have been taken apart. It’s also a good idea at this point to test the water flow in the affected drain to ensure that it has been completely cleared of any obstructions.
Jetting Machine
When a plunger and drain snake aren’t enough to get the job done, you may need something with a bit more power behind it. That’s where a jetting machine comes in. Known by many names, including hydro jets and sewer jetters, these machines use water under high pressure to blast away debris and clogs. They’re ideal for use when there is no accessible access point for a plumbing snake and can help get rid of hard-to-reach obstructions.
In order to use a jetting machine, a nozzle is fed into the sewer or drain line opening. The nozzle is able to rotate and varying types of jets are available to allow for maximum versatility in a variety of situations. A standard nozzle simply blasts water forward in a straight stream, while a rotating nozzle can also be used to scrub the sides of the pipe.
These jets are able to blast debris right off the walls of a pipe, making it easier to remove than simply scraping or pulling it out with hand tools. This process is ideal for removing grease, fats, and oils that may have built up over time. It’s also great for removing any mineral deposits that may be causing a drain line to be slow or clogged.
Another great benefit of a jetting machine is that it doesn’t cause any damage to a drain line. This is due to the fact that it doesn’t rely on metal-on-metal grinding or harsh chemicals. This helps to keep the integrity of a pipe intact and reduces the risk of future issues.
A jetting machine is a great choice for commercial and industrial applications as well as residential ones. In addition to being used for removing blockages, they can also be used for cleaning out sewer lines prior to a pipe lining project. This will ensure that any existing debris is removed so that the epoxy lining can be properly bonded to the existing pipe.
Before attempting to use a hydro jet, it is important to be aware of the risks involved. Make sure that the power outlet is properly grounded before turning it on. Using a jetting machine with no proper grounding can result in severe injury or even death. It’s also important to wear rubber gloves and protective gear whenever you are operating a jetting machine.